Twitter Feed Popout byInfofru

Disable validation on field for specific view

Consider a case when you have single model which is bind to multiple views. For example, UserInforma

Consider a case when you have single model which is bind to multiple views. For example, UserInformation model bind to “Create” and “Edit” view. Now in “Create” view, I want to “Password” field as required but at the same time I want it to be optional on “Edit” view.

It means, In “Edit” view, If user provides “Password” then change it otherwise don’t update the “Password” field.

This is why it is important to create ViewModels, which gives you freedom to have different fields, validations etc for every view.

Now to achieve this goal in the given scenario, we need to make two tweaks.


Client Side

To disable client side validation, we need to disable it by force.

@Html.EditorFor(model => model.Password, new { htmlAttributes = new {  @data_val = "false" , @class = "form-control"} })

Notice the @data_val= “false”. It will disable the validation on this field.


Server Side (In Action)

When the model is validated on the post action, ModelState.IsValid will always return false because password is not provided. Here we have to provide the current password to the model and Re-validate the model.

var userObj = db.Users_Info.Where(a => a.Id == users_Info.Id).FirstOrDefault();

if (String.IsNullOrEmpty(users_Info.Password))
{
    users_Info.Password = userObj.Password;
}

ModelState.Clear();
TryValidateModel(users_Info);

Let me explain, first we retrieve current information saved in the database which we are using later to assign to current model if password is not provided. The last two lines actually reset the ModelState to return updated result on ModelState.IsValid.

Angry Coding Angry smile Angry smile Angry smile

Error : Value cannot be null.Parameter name : PublicKey

This morning, while I added my existing SharePoint project to a solution it start giving me this Error when I do the build.

Error   8   Value cannot be null.Parameter name: PublicKey   

Graphically

ParameterNullPublicKeyError

Strange, because the last time when I run this project it was working fine. Search on the internet doesn’t prove to be much fruitful. So, I compare this project with the existing project which are working fine and realize that for some reason Visual Studio remove the Sign the Assembly checkbox on the project properties and the Public Key is not available. Like below.


unsignesvs

So just check the “Sign the assembly” check box which means that you are signing your assembly with the public key which will now available to Visual Studio to build your SharePoint Project and the error will disappear.

VariationRoot.aspx unavailable after restore

Scenario :

After working on some modules, I have to deploy my site collection to an other machine. For that, I used stsadm.

Once the site collection is restore it keep giving me this

Error File Not Found.

Troubleshoot issues with Microsoft SharePoint Foundation.

Graphically :

spvarerr

Of course, my site collection have variation implemented. I spent an hour on it but didn’t find any thing useful. Then Shehzad Ahmed pointed me to the Language Packs.

So if you are restoring a site collection that have Variation Implemented. You have to install Language Packs before.

But this is not the only thing you should care about. In fact, installing languages pack for me didn’t do the job. So I have to open the log file and check what actually is going wrong.

Then, I realize that the web parts that I was deploying from Visual Studio in my development site is not available on the deployment machine.

That is why, I decided to re-deploy all of my modules to the deployment machine and once I done that. It start working fine.

Why I am posting this is because the error is quit confusing ambiguous.

Solving SharePoint 2010 Setup Errors Manually

If you are installing SharePoint 2010 on a new box you might see the Setup Errors notification from the installer. In my case, I am using Windows Server 2008 R2, but I have seen the similar Error on Windows 7 as well with little less requirements.

sperror

As you can understand all the “-“ bullets are the requirements that needs to be installed or configured on the box.

There are two ways to do this

1) Microsoft SharePoint 2010 Product Preparation tool

In the SharePoint 2010 Splash Form, you can find that with title “Install software prerequisites” or alternatively you can run file “PrerequisiteInstaller” on the same folder as of the setup file. 


2) Manual installation of Prerequisites

Now the question is, why would one select to chose the manual installation when we already have utility provided by Microsoft. The answer is that utility some time fails Smile for me at least, it fails 2 / 3 times.

So, let me explain all of them one by one.

- “A System restart …….”

Hopefully you will not see this because I am installing SharePoint 2010 just after an other installation that is why it is there. So if you see this better to restart your machine.

- “This product requires Windows Identity Foundation”

Download  KB Update from http://www.microsoft.com/download/en/details.aspx?id=17331
Select your operating system carefully. Windows 6.1 is for Windows 7 & 2008.

- “……… Sync Framework Runtime”

Download from http://www.microsoft.com/download/en/details.aspx?id=17616
It downloads a zip file which have five folders container some setup. Now, you don’t need to run all the setups. Execute the setup inside “Microsoft Sync Framework” and you are done with this step.

- “…….. SQL Server 2008 Native Client”

Download it form http://www.microsoft.com/download/en/details.aspx?DisplayLang=en&id=8824
Scroll down to find Microsoft SQL Server 2008 Native Client

- “Windows server features or role services required …. ”

For sure, you will not face this issue in Windows 7 because there is nothing like server featured in Windows 7 but In Windows 2008 (maybe) for security reasons you have configure the features that will be used through Server Manager. To do that

1) Go to Server Manager
2) Select the Features from the tree on the left hand
4) On the right hand you have a page with Feature Summary Panel. Click on Add Features and following window will appear.

spsf

From the list of Features  you have to select the following:

.Net Framework 3.5.1 Features with WCF Activation
Message Queue
Remote Server Administration Tool
Windows Process Activation Service with all sub options.
and feature settings is complete.

5) Select the “Roles” from the tree on the left hand.
5) If you are working on a new box, you will see only Role Summary section in the configuration on the right hand.
7) Click the Add Roles button on the Role Summary panel. The following window will appear

spbub

This window is only informing you about the security concerns. So just click next. The following window have the list of Server Roles available. Microsoft SharePoint 2010 require Application Server and Web Server to be installed. So select them from the window.

spssr

Notice the required sections are highlighted in the underline. Since I have all these requirement already installed that is why the buttons are disabled, but it should be enable for you.

In the Web Server (IIS) section, make sure to select asp.net. However, the default selection is what you needed. Once you finish this, your Roles window should look like this

sprw

Containing sections for Application Server and Web Server.


- “Microsoft Filter Pack 2.0 required ……..”

Ok, you will find Filter Pack 1.0 easily on internet, but that is not the requirement. Actually, Filter Pack 2.0 is available with the name of Microsoft Office 2010 Filter Packs which actually make sense because SharePoint 2010 is the part of Office Suit 2010. Anyway, you can get it from http://www.microsoft.com/download/en/details.aspx?id=17062


- “Internet Information Services 7.0 or higher is required …….”

In Windows 2008, If you have successfully completed the Features and Roles configuration, this is already done because in Role Configuration we already installed Web Server (IIS).

For Windows 7, you have to make sure that IIS 7.0 is installed and configure to  run asp.net.

- “IIS 6.0 Management Compatibility…….. ”

For windows 2008, it is completed with Features and Roles Configuration. But to make sure

1) Go to Server Manager
2) Roles
3) From the Web Server (IIS) panel on the right hand (not on the tree), maximize the Role Service and see if you have IIS 6 Management Compatibility there like below

spimc

For Windows 7,

1) Go to Program and Features
2) Select Turn Windows features on or off.
3) Make sure you have IIS Management Compatibility feature checked under Internet Information Services.

spimc7

- “Microsoft .net Framework 3.5.1 required  ……. “

For Windows 2008, if you have completed Features and Roles configuration you are done. For Windows 7, just make sure that you have .net Framework 3.5 SP 1 runtime is installed. Get it from http://www.microsoft.com/download/en/details.aspx?id=22


- “Hotfix for Microsoft Windows (KB976462)”

This is Windows 2008 R2 Specific, which can be found at
http://connect.microsoft.com/VisualStudio/Downloads/DownloadDetails.aspx?DownloadID=23806

- “Microsoft Chart Control ……..”

It is straight forward setup download which you can get it from here
http://www.microsoft.com/download/en/details.aspx?id=14422


Hopefully once the above steps are taken, the setup errors will be finished. Your comments are welcome if you face any issue which is not listed above and you think that can help someone else.

Installing SQL Server 2008 on Windows Server 2008 R2

In my attempt of installing and configuring SharePoint 2010 Farm, I have given a new Windows Server 2008 R2 box that should have SQL Server 2008.

So when I attempt to install SQL Server 2008 on it, I came across the following error message.

sqlerror_thumb[3]

Not so weird because every server product have a set of requirement to be installed. First off, before you do any thing Just run the Windows Update. That’s recommended because there can be some thing else that is not mention in this post or any other but can hanged you for some time.

Ok now come to the second part of Enabling .Net Framework Core Role. For that you have to
1) Open Server Manager and Go to the Features on the tree available on left hand.
2) From the Features Summary, Click Add roles.
3) Following window will appear.

selfeatures_thumb[2]

4) You have to check the top most option which is (in my case) .net Framework 3.5.1 Feature. That’s it

if you are installing SQL Server 2008 for SharePoint, make sure to check WCF Activation also, Like I did.

Cheers

Ambiguous in the namespace problem

From the last few days, I was ignoring an error that keep coming at the compile time. I spent some two hours on it before but didn’t get it work. The error is quit confusing and of course difficult to manage.

'ApplicationSettingsBase' is ambiguous in the namespace 'System.Configuration'

'MailMessage' is ambiguous in the namespace 'System.Net.Mail'

And there are couple of other similar errors that is pointing to some ambiguous references in my project.  The confusing part is that the MailMessage object throws similar error when you are importing the old and new email namespace.

For example,

Imports System.Web.Mail
Imports System.Net.Mail

So if you are only encountering ambiguous problem in MailMessage object. It is more possible that you have define both the namespaces in your code behind which is actually confusing the compiler about your referencing object.

The quick solve for this problem is that remove Imports System.Web.Mail and it should work smooth. But with me, I never used the old asp.net mail namespace in my project.

Then I start looking at my references and luckily I found the problem there. Follow the steps below to investigate the issue

1. Go to your project

2. Then references

3. Right click on “System” and see properties. it should point to the following path

x:\Windows\Microsoft.NET\Framework\v2.0.50727\System.dll

Where x is name of your operating system directory. This was the problem with my project. I had my operating system install on “D” drive and some how it is pointing to “C” drive which is the root cause of this problem.

After that I verify all my references and found 5 –6 assemblies that are pointing to wrong path and get it worked.

Also note, the problem can occur in any type of project either it is website , web application etc.

Background-Position in FireFox

Like me if you are trying to get the background-position style working in Mozilla FireFox and still un able to find the problem check how you gave the value there.

Basically, Background-Position can accept value in two parts “x” and “y”. For example,

background-position : "x y"

Of course, “x” represent the X axis where as “y” represent Y axis. Now you can define the value of both the axes in the following way. 

Method Example
In Word center top
top left
In Pixels 10px 200px
In Percentage 15% 300%


So, if you ever wish to use Background-Position in firefox, use the Percentage method, nothing else gonna work.

Following is the workable in Firefox

background-position: 0% 10%

Following is the JavaScript style

objDiv.style.backgroundPosition="0% 10%"

Setting up SVN on Windows

Subversion is ultimately one of the best source control option we have in today’s world. it has very light instance running on Server and of course it is FREE.

To access the Subversion repository on the client machine we have multiple options. If we want to use shell integrated UI (means we can call your source control options in our windows explorer), we can use TortoiseSVN but being a developer based on Visual Studio it always looks good to get my source control on Solution Explorer inside Visual Studio world and for that we have Visual SVN  which off cost  and  AnkhSVN which is FREE.

One time server configuration is needed on almost every server software so as with SVN. After downloading and installing SVN following configuration is needed in order to work properly. By the way, we are assuming that you download the setup from CollabNet.

Download URL : http://www.open.collab.net/downloads/subversion/

Installing SVN (CollabNet):

This installation is next next stuff but the following screens needs a little awareness.

settingup_svn_service

Port will be the default port on which the Subversion server listen for the request and the repository is a location where your source code will be saved.

Notice the checkbox, titled “Install svnserve to run as Windows service”. If this box is checked SVN will run as windows service and will be available as soon as the Server Machine starts.

settingup_svn_apache

It is important to understand that the SVN works on the Apache web server. If you are already using any other web server such as IIS, it is important to change the port of the Web Server. Also, an other checkbox is available to run the Apache web server as windows service.

Configuration:

Well, the above mentioned setup has done almost every thing for us. But still following configuration needs to understand in case of getting command over SVN.


    1. Configure SVN to run as service (Manually)
    2. Creating Repository (Manually)
    3. Configure Security
      1. Enable / Disable anonymous access
      2. Create Users
      3. Authorization
    4. Firewall Consideration 

Configure SVN to run as service (Manually):

To create SVN run as Windows service, we need to open CMD and run the following command

sc create svnserve binpath= "
    \C:\Program Files (x86)\CollabNet\Subversion Server\svnserve.exe\"
    --service --root c:\repos" displayname= "SubVersion Server" 
    depend= tcpip start= auto


Notice that the path of the svnserve.exe might be change in your case. Once we run this we can now see our newly created service in the service console.

settingup_svn_servicelist

Just in case, if we want to delete the service we can run the following command in cmd
sc delete svnserve

Creating Repository (Manually):


To create repository we need to use svnadmin utility. Following is the procedure

    1. Go to Run (Ctrl + R) –> CMD
    2. Go to the install directory of SVN in my case it is ( C:\Program Files (x86)\CollabNet\Subversion Server)
    3. Run command : svnadmin create C:\svn_repository  (we can change the path according to our need)

Configure Security:

Like other source control, you can create users in svn, give them right what they can do and all that important stuff but the user right assignments are change from repository to repository.

Once you successfully create a repository, you will find the following items under the folder of repository.

settingup_svn_folder

Now open the “conf” folder and create the following file (if it is not already there)svnserve.conf

and add the following lines

[general]
anon-access = read
auth-access = write
authz-db = authz
password-db = passwd

Disable anonymous access:

Anonymous access can be very useful in many scenario but in our case, we want to disable this access. To do this, we will edit svnserve.conf file and comment the anon-access line. after editing that file, svnserve.conf file will look like as below

[general]
#anon-access = read
auth-access = write
authz-db = authz
password-db = passwd

Of course, to enable the access we have to un comment this line.

Create Users :

If you have notice the last line we wrote in svnserve.conf file, it is password-db = passwd. Basically, it is the name of the file which contains the information about users.

Now lets create a file named “passwd” with no extension and add the following lines.

[users]
admin = adminpassword
admin2 = admin2password
ausman = ausmanpassword
ruser = ruserpassword

Note that the string before “=” is user id and the later one is password. if you still confuse, here is the formulae :)

username = password

That’s how, this file is saving the user information. Now, create as many users you want.

Authorization:

Now notice the second last line of the svnserve.conf file, where it says authz-db = authz. Basically, it is the name of the file which contains the authorization information about the users.

Now let’s consider the situation, where you want to create two set of users in your repository. It can be “Administratots” and ‘Regular Users’. You want to give read / write permission to both the users but on some folders you want only “Administrators” to write  files.

Now lets create a file named “authz” with no extension and add the following lines.

[groups]
adminstrators = admin, admin2
regulars = ausman, ruser

[repository:/]
* =
@adminstrators = rw
@regulars = rw

[repository:/trunk/admin-files]
* =
@adminstrators = rw

Ok, now let me explain how we did the whole thing line by line.  In the first three lines we simple created two groups that we discussed before.
On line no 4-7, we gave general write permission on every folder of the repository to both the groups.
On line no 8-10, we gave a special write permission to group named “Administrators”  for a folder called “admin-files”.

There we go, every thing is configured and we are ready to access the files from SVN Client.

Firewall Consideration:

As mentioned earlier SVN server listen for the request on port number 3690. In my case of implementation, the server was using Windows 2008 built-in Firewall which means, I can access the SVN server locally but from any remote machine I wasn’t able to get the files..

To do that, we simply need to add the port 3690 in the exception list of Firewall and allow the traffic coming thru this port.

That’s it and we are all done :)

Happy Eid-ul-Fitar 2009

Not too long a ago I can call myself blogger :). Actually I am posting any thing to my blog approximately about a month after. I have sacrifice some commitments to save the most important commitment to ALLAH. These 29 days of Ramadan went like a flash, it seems Ramadan start just yesterday.

I have not been a religious being in this holy month. Just finished the 12 days Taraweeh and a Holy Qur’an which I have started before Ramadan. Indeed, I pay thanks to ALLAH who make me enable to do all this worship. I can do nothing by my self :).

My family is about to leave for my grand parents house that’s why let me wrap up this post by saying HAPPY EID-UL_FITAR to all of you. May ALLAH shower his blessings to all of you and make these three days the memorable days of your life :). Don’t forget the needy people near you who cannot afford to have joy of eid.

Getting started with Unit Testing in C#

In this post, I will explain you how can we write a unit test in c#. It is a basic guideline for those who wants a quick start. Unit testing is an integral part of any software that is developed. It is an advantage which most of us are either not aware of or we are neglecting it. It actually helps a developer to write error free code.

Introduction:

In this post, I will explain you how can we write a unit test in c#. It is a basic guideline for those who wants a quick start.

Unit testing is an integral part of any software that is developed. It is an advantage which most of us are either not aware of or we are neglecting it.  It actually helps a developer to write error free code.

To write unit test, we will first install a unit-testing framework.


About Unit-Testing Framework:

Well, Unit-Testing Frameworks are useful to simplify the process of unit testing. If you don’t want to use any framework then you can still do unit-testing by writing the client code which implements assertions, exception handling etc.

There are numerous framework available for unit testing. A list of which can be found here . But in our case, we will use NUnit to test our code because it is easy to use, show detail test reports and of course open source.


Installing NUnit:

To download the NUnit goto : http://www.nunit.com/ and download NUnit Windows MSI. The installation is a conventional next next stuff. So, you will not face any hard time.


Writing Testable code:

Now open visual studio and create a new console application (I name it TestAbleApp). Please note, to do unit-testing it is not important to write your code in console application. It is just a matter of my choice because I want to make it simple and easy to understand.

Create a new class call it “Utilities” and write the following code.

public class Utilities
{
    public enum Gender
    { Male =1,
      Female = 2
    }


    public string GetCompleteProfession(string professionName, Gender g)
    {
        string strPronoun = string.Empty;

        if (g == Gender.Male)
            strPronoun = "he";
        else
            strPronoun = "she";

        if (Regex.IsMatch(professionName,"^[aeiou]"))
            return strPronoun + " is an " + professionName;
        else
            return strPronoun + " is a " + professionName;
    }

    public decimal GetWeeks(DateTime dtFrom, DateTime dtTo)
    {
        int Days = ((TimeSpan)(dtTo - dtFrom)).Days;
        decimal Weeks = Math.Ceiling((decimal)Days / 7);
        return Weeks;
    }
    public decimal GetDays(DateTime dtFrom, DateTime dtTo)
    {
        int Days = ((TimeSpan)(dtTo - dtFrom)).Days;
        return Days;
    }
}

Let me explain, we have an enum here which hold the gender and we have a function which have Profession and Gender as parameter. it will simply return a formatted string. For example if someone pass

GetCompleteProfession(“System Analyst”,Gender.Male). It will return “He is a System Analyst”. A very simple function.

Then we have a function that will take date range as parameter and return the number of weeks in that range. We call it GetWeeks and another function is GetDays which takes same date range as parameter but return days instead of week.

We are completed with the testable code. If you want, you can check the output of the functions.


Writing Unit-Test:

To write a unit-test, create a class library project under the same solution and call it, “TestProject”. Now, create a new class and name it “UtilitiesUnderTest”. The naming convention can explain that this class contain the unit test of class “Utilities”.

Now, Add the executable of console application which we have created before (In my case, it is TestableApp ) as a reference in TestProject.

To use the NUnit Testing framework, we also need to add the reference of NUnit Dll which you will find under the .net Tab in Add Reference window.
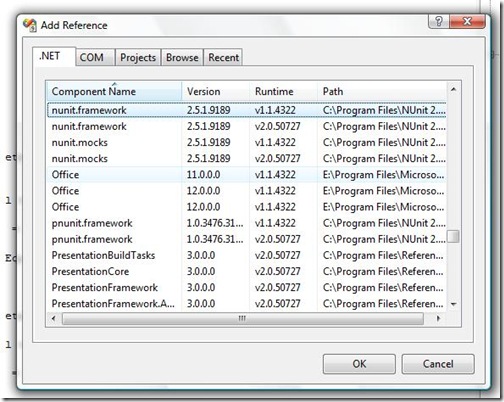
sc_unittest_1


Create a class and call it UtilitiesUnderTest. Naming convention shows that we are creating a test code for class “Utilities”. Now write the following code.

[TestFixture]
class UtilitiesUnderTest
{
    [Test]
    public void GetCompleteProfession_Return_SheIsASoftwareEngineer()
    {
        
        Utilities objUtil = new Utilities();

        string strResult = objUtil.GetCompleteProfession("software engineer", Utilities.Gender.Female);

        StringAssert.AreEqualIgnoringCase("She is a software engineer", strResult);
    }

    [Test]
    public void GetCompleteProfession_Return_HeIsAProjectManager()
    {
        Utilities objUtil = new Utilities();

        string strResult = objUtil.GetCompleteProfession("software engineer", Utilities.Gender.Male);

        StringAssert.AreEqualIgnoringCase("He is a software engineer", strResult);
    }

    [Test]
    public void GetCompleteProfession_Return_HeIsAnEngineer()
    {
        Utilities objUtil = new Utilities();

        string strResult = objUtil.GetCompleteProfession("engineer", Utilities.Gender.Male);

        StringAssert.AreEqualIgnoringCase("He is an engineer", strResult);
    }

    [Test]
    public void GetWeeks_Return_6()
    {
        Utilities objUtil = new Utilities();

        decimal weeks = objUtil.GetWeeks(DateTime.Now.AddDays(-42), DateTime.Now);

        Assert.AreEqual(6, weeks);
    }

    [Test]
    public void GetDays_Return_25()
    {
        Utilities objUtil = new Utilities();

        decimal days = objUtil.GetDays(DateTime.Now.AddDays(-25), DateTime.Now);

        Assert.AreEqual(25, days);
    }
}

Notice the Attribute, [TestFixture] is used to mark a class as a test class where as [Test] is used to mark a method as Unit-Test (test method). It is used by Unit testing framework like N-Unit to test the code.

Also notice, the name of methods. It is named like “{MethodUndertestName}_Return_{ExpectedReturnValue}”. The naming convention is there to make your tests readable for others.

Now come to the explanation part of the first three functions.

In the first of line each function we are creating an object of the class under test (In our case Utilities).
In the second line we are calling a method under test by specifying parameters.
In the third line we are using StringAssert to Assert the returned value.

Now notice the last two functions, the first two lines are same. The minor difference is in the last line. Instead of using StringAssert, we are using Assert to test the return value.

Once, you have complete writing the Unit-Test. Now its time to see it in action.

Running Unit-Tests:

Run NUnit, Goto File –> New Project and specify the location.
Now, Goto Project menu and select Add Assembly and locate your TestProject DLL, the one which you created to test your code.
Once, you have done that, you will all your Unit-Test in the left pane as shown below.
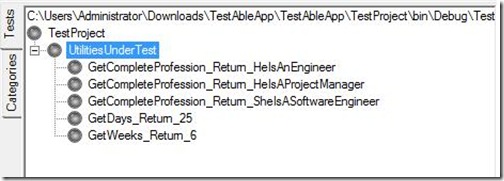
sc_unittest_2

Now, click the big run button on the right pane and you will see the result as give below.
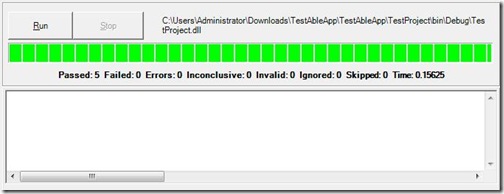
sc_unittest_3

Happy ending, green progress bar means every thing went well. Now let’s create another unit-test in out test class which will fail out tests. So that, we can see how NUnit reacts when a test fails.

Lets add the following method in our test class.

[Test]
public void GetWeeks_Return_3()
{
    Utilities objUtil = new Utilities();

    decimal weeks = objUtil.GetWeeks(DateTime.Now.AddDays(-8), DateTime.Now);

    Assert.AreEqual(3, weeks);
}


Here I am giving the range of eight days and expecting my function to return 3 weeks instead of two. Now, when I run the test it will get fail and NUnit display us something like below.
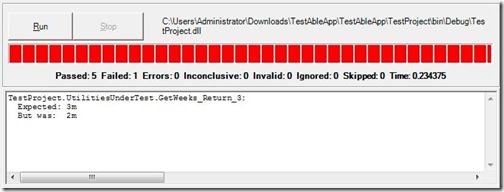
sc_unittest_4

Red progress bar means, some thing went wrong and notice the text area at the bottom. It will show you the detail that you were expecting three but the function returns two. That is the test get fails.

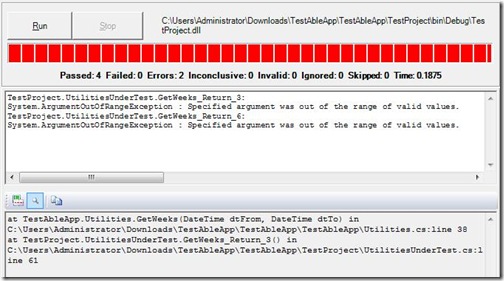
Now lets see what happen when any exception occur in the function we are testing.  Add the following line in GetWeek function

throw new ArgumentOutOfRangeException();


Now, when we run out tests, we will see some thing like below.
sc_unittest_5

NUnit fails our test with the exception with Stacktrace at the botoom.


Conclusion:

This was just a quick start of doing test driver development and write Unit-Tests that is why we create unit-test for very simple functions. In future, I will be posting the unit-tests which I will write for some more complex functions.

I have tried to make it simple for you guys to grab it and start writing your own unit-test. The resource I found very valuable for starting test driven development is Roy Osherove’s The Art of Unit Testing.